Creating web test
Creating a web test is similar to any other test in Visual Studio. There are three different ways to create a new web test:
1. Select the test project, right click, and choose Add. Then select the option Web test from the context menu.
2. Select the menu option Test and choose New Test… which opens the Add New Test window and it contains the different test type templates.
3. Select the menu option Test and choose Windows and then select the Test View, which opens the test view window listing all the available tests. Right-click on the surface of the Test View window to open the context-menu. Choose the New Test option which opens the Add New Test window.
4. After selecting one of the above three, select the Web Test template from the list of different test types.
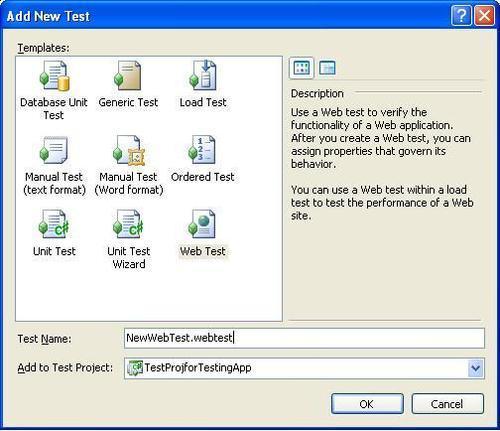
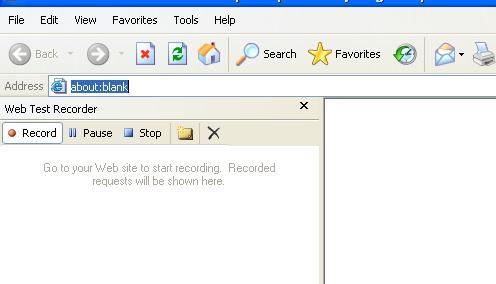
Once you select the Web Test and click OK
you can see the test getting added to the selected test project and a
new instance of a web browser opens. The browser contains the Web Test Recorder in the left pane.
Recording a test
Web applications can
be easily tested by recording the requests with the recorder. This
recorder will track all the web requests. We can easily find out the
expected requests from the recorder and identify any defects coming
along with the requested page. The user can request the web pages to
record and create the test scenario. Once the scenario is created we can
build the scenario or customize it to make it more dynamic.
As stated above, once
after starting the web test, a new browser window opens with the web
test recorder. Recorder has five different options discussed as follows:
Record—to start recording the web page requests.
Pause—this
is used to pause the recording. In some cases we may not want to record
some pages in the application. But we should have identified the pages
for which we may have to pause the recording and restart the recording
for the next coming pages.
Stop—this is to stop the recording session. As soon as we click on the Stop button, the browser will close and the session will stop.
Add a Comment—this option is used for adding any comments to the current request in the recording.
Clear all requests—to
clear out all the requests in the recording. Sometimes if we make some
mistakes in the recording or if the web application that, we are testing
is not the correct one, then we can clear all the requests and start
from the beginning.
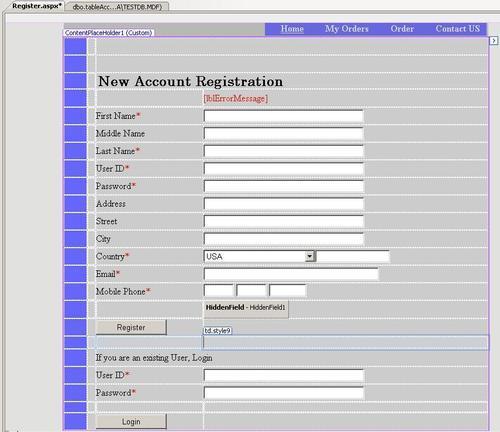
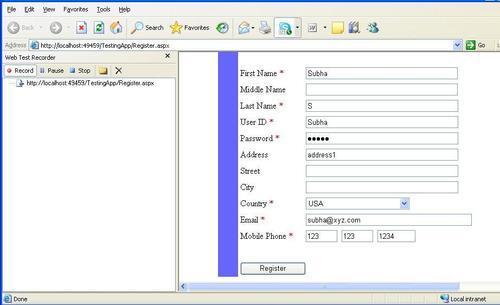
Before we proceed to the web
testing let us create a sample web application for testing. Let's
consider a user registration page where in the user has to provide the
information like First Name, Last Name, Middle Name, User ID, and Password.
This information is required to keep track of user activity in the web
site, which is common in most of the web sites. For our example, let us
consider only this registration page. It contains a Register
option which collects all the information entered by the user and saves
it to the database table. The user entries are validated as per the
requirement, which we will see through the examples in subsections. The
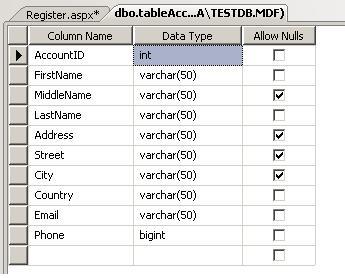
database is the SQL Server database with one table for storing all the
information. We will use the SQL Server Express for all database
operations. The next screenshot shows the database table for the sample
application:
The sample
application web page user interface is as shown below with some required
fields including a fields to show the validation error messages and the Register button to send the request:
The application can be tested
when it is hosted on a web server or when it is running on the local
development web server within VSTS. The examples given in this article
are based on the local VSTS development server. The approach is the same
for hosted application on a web server like IIS 6.0.
As we are using the VSTS
local development web server, build the new web project and keep it
running. Get the web address from the running web application so that we
have the web address with dynamic port assigned to it.
First let us look at the
features of the web test and then we can go in detail about collecting
information from test and the actual testing.
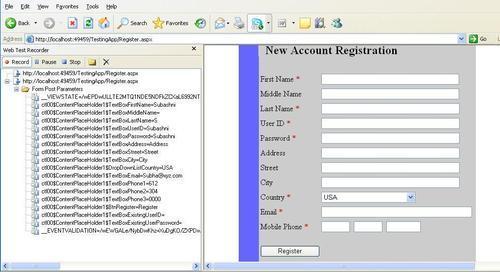
Create a new web test so that
you get the new web test browser recorder window. The Web test tool
opens the Microsoft Internet Explorer browser for the recording. Now in
the Address bar enter the web page address and hit Enter. In this case it is going to be http://localhost:49459/TestingApp/Register.aspx
(this is a test address using the local web server and will vary based
on the dynamic port assigned to it). If you are planning to test the
application from the hosted server, then record the test by browsing the
web pages from the hosted server. Whether it is hosted server or a
local development server, the web application should be up and running
for testing. Once you get the web page, enter all the required details
and click on Register.
You can see each row getting added to the tree view below the recorder
toolbar. All request details will get recorded until we hit the Stop button or Pause
button. To get the test scenario right, enter all the required fields
and perform a positive test so that there are no error messages
displayed. After getting the scenario, we can perform invalid entries
and test the application.
After entering the URL and hitting Enter in the Address bar you can see the page loaded on the right and the request is captured on the left.
Enter all request details and then click on the Register
button. As soon as the web page is submitted, we can see the second
request captured by the recorder with the details and shown in the tree
view.
We had two requests during the
recording—one for page display and the other for submitting the page or
registering the details. The details of these requests are displayed in
the tree view. If you expand the second root node in the tree view, you
can find different values or strings passed by the web application by
clicking Register button captured under the folder Form Post Parameters. You can also notice the event that took place by clicking the Register button in the web page. All other details are the parameter values posted by the request.
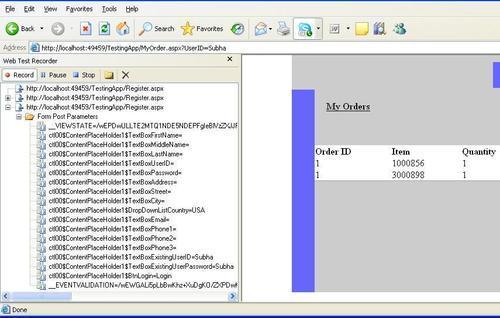
Below the Register button is the Login section. Here the user can enter the credentials and go to the My Orders section where user orders are displayed. This is a redirected request from the Register.aspx page to MyOrder.aspx submitted using HTTP-GET method by sending the userid in query string parameter. There are different protocols used for sending the requests: HTTP-GET, HTTP-POST, and SOAP.
HTTP-GET: Hypertext
Transfer Protocol-GET protocol appends the query strings to the URL. The
Query string is the name and value pair, which created out of the
parameters and data.
HTTP-POST: Hypertext Transfer Protocol-POST protocol passes the name and value pairs in the body of the HTTP request message.
SOAP protocol is an XML-based protocol used for sending the structured information. This is mostly used by the web services.
From the recording details you
can see that only the independent requests (GET or POST) are recorded
but not the dependent requests like getting the images and the other
requests. These requests will be reported only when the test is run, but
during recording it will not be shown or captured.
Adding comments
While recording the web page
requests, we may need to add some comments about the page or the test.
This comment could be any text with additional information for our
reference. This is similar to the comments that we add to our code
during development. Sometimes we may need to add information about the
steps to follow during the test. Basically comments are to record the
information about the task that we may have to do during the test but we
easily forget to do. These comments can be added by just clicking the Add Comments button in the Web Test Recorder toolbar.
Cleaning the recorded tests
In the web test
recording we might have requested many pages, but at the end of
recording we may not need some of the requests to be part of testing.
This is because we might have forgotten to stop and restart the test or
we might have stopped and restarted the test at the wrong place. To
remove the unwanted requests, we have to edit the recording. We should
go through each recorded request and delete the requests which are not
required.
Copying the requests
In some situations we may
need the same requests to be tested multiple times. For example, page
refresh. To simulate this, we can copy the recorded requests and place
them into the recording list. We can copy the request any number of
times.We need to select the request from the list in the tree view,
right-click and Copy or use (Ctrl + C) and then select the destination folder and right-click and choose Paste.
By copying the requests we
are also changing the order of testing. This is the easy way to change
the order. Instead of copy, we can also cut and paste the requests to a
different place just to change the order. But we should be careful in
changing the order so that the dependent requests are not affected. For
example, if request B is dependent on request A, then we should not move
request B before A. We should take more care while copying and changing
the order of tests.